I have a plan.... I think.

Little update. It's not been a good week. On other issues, my flock of chickens were decimated by someone's loose dog that found it's way to the farm.

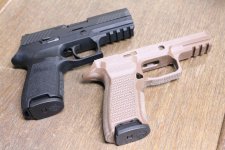
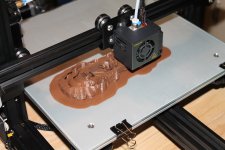
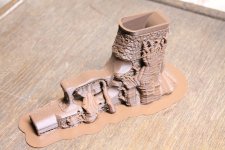
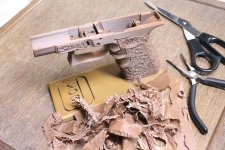
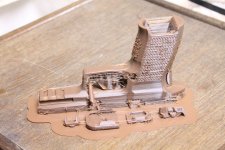
3D printing also had some setbacks. The Fusionworks PLA+ "skin" colored material is more like a soft plastic. A real pita to print with. I haven't had a successful print with it yet. Bed adhesion issues and the material is kinda rubbery after printing. Ended up ordering a roll of eSun PLA+ in matte brown to try this again.

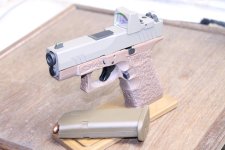
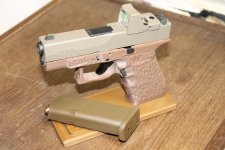
Meanwhile, the jig for the JDS P320 MUP showed up. MUP itself hasn't made the scene yet, even though it was ordered a few days before the jig.
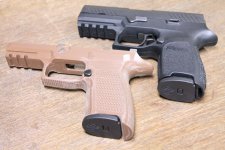
 
Sucks about your birds. I have chickens and for a critter to dispatch them is a hit in the heart for sure. Time to lock n load on the canine.
Thanks for the update.
Couple other filaments u may like to try-
Polymaker pro is similar to esun pla+. Some firearms makers like better.
Hatchbox pla prints very smooth. Haven’t had a bad days with all the colors I’ve tried so far. Grey and bronze have been best for smoothness. It good to print general stuff.
 
Here we are, another week gone by.

On the flock, well took a gamble and bought a dozen Columbian Wyandotte peeps to re-populate the coop. Three of the older hens survived the rampaging dog, by virtue of remaining inside the coop where the dog couldn't get in. One of the hens was already broody and had been parked on a pile of eggs for the past month (I think they were all duds.) So, the local Tractor Supply was selling peeps, and I had gotten some advice to just wait until midnight and slip the new peeps into the nesting box with the hen, then let nature do it's thing. Turned out to be really good advice. All of the peeps got adopted into the tribe and are currently being cared for by the broody hen.

Ok, back to 3D printing. The roll of eSun PLA+ arrived this afternoon. Spent most of the day messing with temp and flow values to get the stuff to print and stay attached to the bed. Currently at 120% flow, 0.4 nozzle, 210 temp, 60 degree bed, and using glue stick on the bed. That appears to be working and the print head isn't trailing a bunch of threads behind it. Right now it is about 80% of the way through printing a copy of the Vivitar 120 tripod quick change adapter, which I kinda need for mounting my chronograph on (tired or sharing one between the camera, spotting scope, and chronograph.) I'm really glad some enterprising soul on thingaverse modeled one... the tripod was discontinued decades ago and you just cannot buy the adapter mount anywhere.

The ChairmanWon 26X with triangles has been set up and sliced. Ready to turn the printer loose on it as soon as the tripod part is done.
 
I've had great luck in general with eSun PLA+ (not tried a gun frame yet). If that works for you and you have a Microcenter nearby, try Inland PLA+. My understanding is it is made by eSun. I've had luck with it as well.
 
I've had great luck in general with eSun PLA+ (not tried a gun frame yet). If that works for you and you have a Microcenter nearby, try Inland PLA+. My understanding is it is made by eSun. I've had luck with it as well.

Thanks, never heard of that retail chain, but they ship and are within a hundred miles of me (USPS is about the only reliable shipper in my area.) I will consider that filament maker in the future.

Printer has been humming all night. 21% complete. Looking kinda wild with the tree supports.
 

Attachments

  • 26X_Triangle_20220726_1.JPG
    26X_Triangle_20220726_1.JPG
    3.7 MB · Views: 48
Last edited:
Another day, the print is at 90% complete ( 1day 7 hours of print time ) Looking really good. It should be done before I have to leave for work. Photos to come.
 
And, 1 day 10 hours of print time, it is done!

Just rubbing my finger over the surface, it is shedding bits of stray plastic. So, lots of cleanup to come.

Printer is warming back up, going to start printing a P320 grip module before starting to clean off the support structure of the 26X print.
 

Attachments

  • 26X_Triangle_20220727_1.JPG
    26X_Triangle_20220727_1.JPG
    4.9 MB · Views: 50
And now all the support tree structure remove. It was very easy to remove this kind of support using fingers, a pair of scissors, and needle-nose pliers to reach into areas.

I'm rather pleased with how this one turned out. So far it looks correct in terms of dimensions. Magazine went right in all the way to the stop. Tonight I'll have some time to work on the rails & locking block.
 

Attachments

  • 26X_Triangle_20220727_2.JPG
    26X_Triangle_20220727_2.JPG
    5.5 MB · Views: 55
Yea!!! Another successful print. A Sig P320 grip module, along with the some odds and ends, just finished a few minutes ago. Time to start cleaning off the tree supports. At least this will be very easy to complete. Might just jump the queue since I have all the parts to try out in it from a factory P320.
 

Attachments

  • P320_20220728_1.JPG
    P320_20220728_1.JPG
    5 MB · Views: 51
Yea!!! Another successful print. A Sig P320 grip module, along with the some odds and ends, just finished a few minutes ago. Time to start cleaning off the tree supports. At least this will be very easy to complete. Might just jump the queue since I have all the parts to try out in it from a factory P320.

"Hershey" edition! ;)
:LOL:
 
Ok, for the Sig, all of the supports removed and in the process of cleaning up the grip module. I hit a little snag I didn't notice in the drawings (and my limited experience with the P320 family.) My factory made Sig is a P320C. The 3D printed grip module is for a P320 with the right slide length, but a different style of magazine base plate.

So, while the printer is heating up to print some magazines (Menendez/Glock and Sig), I think I will just put the grip module on the milling machine and shave off some of the front edge of the mag well to match the style of factory magazines I already have. In the side by side photo, you can see where the difference in mag well contours are. It shouldn't be a problem for the mill... the print is 100% filled, so there is no void space there to cut into.
 

Attachments

  • P320_20220729_1.JPG
    P320_20220729_1.JPG
    5.4 MB · Views: 45
Plan is working ;) Tonight I got as far as fitting the mag release and starting to trial fit of the FCU (using the newly arrived MUP-1 for the moment.) So far, so good. I might get this finished before going back to the ChairmanWon 26X
 

Attachments

  • P320_20220730_1.JPG
    P320_20220730_1.JPG
    5 MB · Views: 45
  • P320_20220730_2.JPG
    P320_20220730_2.JPG
    5.2 MB · Views: 44
Busy weekend, not much to report on the 3D printed pistols. The printer has been humming all weekend, making magazine racks and pistol stands. I sortta got frustrated with the level of clutter in the gun safe and decided to reorganize. About the third time a really long Dewey cleaning rod fell over and thwapped me on the head, I reached the point of no return.

My old gun safe (a simple steel "Sentinel" cabinet I bought at WalMart back in the 1990's when I was living in Florida) is being overhauled to be nothing but storage for ammunition, cleaning, and reloading supplies. It had been sitting empty in the basement since the move. That will clear out a bunch of room in the main safe for the actual things that go Boom. Been building shelves all weekend and bolting them into the safe.
 
Still chugging away on the projects. I did pick up a non-printed grip module to try out on the P320... one of the Wilson Combat grip modules (compact, no safety model).... Oh, does that feel good in the hands. Feels a lot like the 1911.

Picking up another spool of eSun PLA+ filament at the post office this morning. Dark grey this time. I tried ordering from MicroCenter, but they took exception with my address and I couldn't order online.
 
I had to take another little hiatus that occupied most of the weekends and evenings for the past few weeks. One of my part-time co-workers is trying to set up an auto body shop as his primary business. He got handed a whole bunch of junk Mac Pro computers from the local college. So, I spent my time tearing them down to parts, weeding out the usable, doing firmware updates, and putting several usable machines together. Been a long time since I did this work for a living. When I last worked on a Mac, the latest OS was 10.6 Snow Leopard.... Now I've gotta figure out 10.11 El Capitan and 10.13 High Sierra. At least Linux Mint 22 runs on them, so he got a few PC's that meet his needs.

But, back on task. Going to try switching the nozzle diameter down to 0.2mm and try to print another ChairmanWon design in PLA+. I just want to see what happens with the smallest diameter extrusion I can produce.
 
Last edited:
First one ready to fire a test shot...

Still a little rough, but currently functional. We'll find out this weekend if it can hack a mag of my mild 9mm target loads.
 

Attachments

  • ChairmanWon_26_20221001_4.JPG
    ChairmanWon_26_20221001_4.JPG
    4.5 MB · Views: 39
  • ChairmanWon_26_20221001_3.JPG
    ChairmanWon_26_20221001_3.JPG
    4 MB · Views: 40
  • ChairmanWon_26_20221001_2.JPG
    ChairmanWon_26_20221001_2.JPG
    3.7 MB · Views: 40
  • ChairmanWon_26_20221001_1.JPG
    ChairmanWon_26_20221001_1.JPG
    4.2 MB · Views: 40
Back
Top