
- Joined
- Jun 19, 2022
- Messages
- 950
- Reaction score
- 1,381
- Points
- 108
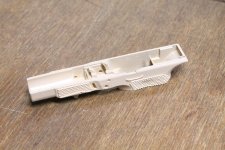
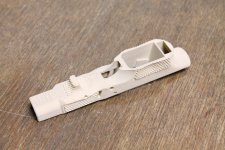
Dozed off and missed the point where the filament ran out. Printer just flagged the error and parked the head in the corner of the bed. It got as far as the trigger guard, so it is a success for my purposes. Took about an hour to clean off all the excess supports. And for the purposes of taking pictures, it got a quick coat of flat brown paint.
Now to twiddle my thumbs for a few days and wait for parts & more filament to show up.
Now to twiddle my thumbs for a few days and wait for parts & more filament to show up.
")


 . Back to your idea. After u slice, preview the model. On the right is a slider with number of layers. Bring it down to the layer you want to stop at to install the metal plate. Take note of that layer number. Then goto Extensions (top leftish) - post processing- Modify G Code- pause at height. At top right change Height to Layer. Now simply type in the layer number u want to pause at. If you see a red notice by the slice button
  reslice and save and print. Now the printer will stop and park itself and stay heated to 200* unless u change the temperature. All u have to do is figure out about what time that will occur so you can what do whatever is needed and get it resumed. There’s also a change filament script which can be used to pause print also.