JeffTech 124
New member
- Joined
- Jul 5, 2022
- Messages
- 3
- Reaction score
- 0
- Points
- 1
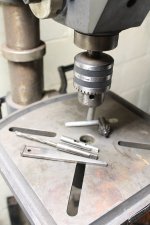
Has anybody been able to mill a lower AR P80 lower frame using a Dremel drill press workstation?

Has anybody been able to mill a lower AR P80 lower frame using a Dremel drill press workstation?
What heDo yourself a favor and buy an 8" drill press instead. You can accomplish more. Drill holes in frames, drill hole in gas blocks to pin to a barrel, etc.
 said.
said.As for torque... well, I don't hold the work, I clamp it to the table, but I've got a lot of practice finding the center of the hole...
Yes sir. That's the way to do it. I ended up with a couple polymer lowers, a Polymer80 and an EP Amory, without safeties before I figured out to drill before you mill on polymer.Ditto what USApat said.. drill the pin and safety holes as the first step. From both sides towards the middle. That will support the tip of the drill as it chews through the plastic and does not tear out.
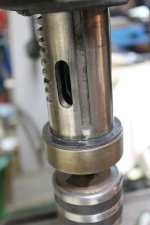
I used a grizzly g0704 milling machine on one a few years ago. Real easy to mill/cut. You shouldn't have any problems with a dremal tool.Has anybody been able to mill a lower AR P80 lower frame using a Dremel drill press workstation?
I used a router to millHas anybody been able to mill a lower AR P80 lower frame using a Dremel drill press workstation?
Nope, I've done 2, one polymer, and one aluminum on a drill press with an X-Y table.Has anybody been able to mill a lower AR P80 lower frame using a Dremel drill press workstation?
Right on. What about how people say cutting with a drill press is hard on the machine because it's meant to drill straight and not cut sideways? What's your opinion on that?Nope, I've done 2, one polymer, and one aluminum on a drill press with an X-Y table.
Right on. What about how people say cutting with a drill press is hard on the machine because it's meant to drill straight and not cut sideways? What's your opinion on that?
For polymer/plastic milling on P80's product line, use mineral oil available at the grocery store. Cheap: $2-$3 for a bottle and goes a long way. Works on P80 pistols too with drilling, grinding, sanding, etc....Thanks to OP for starting this helpful conversation. Tacking on a related question...
Is it recommended to use cutting oil when milling a P80 AR lower? If yes, best options?