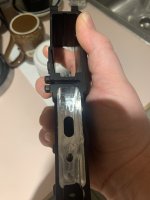
Congrats on milling first lower. It appears to be functional, but I have a few suggestions for your next lower.
1. Have a firm grip on the router when you start it up. They tend to wander until it is fully up to speed.
2. Always make sure the mill bit is not touching any surface when you start it. Touching any surface will cause the mill bit to jump around and nick the lower.
3. Extend the depth about 1/2 mm at a time. Cutting too much with each pass will create a rough surface in the FCG pocket. You will make more passes with this approach, but the router will be more controllable and the walls of the lower will be smoother.
4. When you finish milling a level, hold the router until the bit has stopped. This will also prevent nicks and scratches.
Let us know how she functions once you have it completed.

")


 ).
).
 !
!