Product Review Lee Pro Pot IV Electric Melter--Refurb and Eval...and the lead (leed) up.

Bobster

Mega-Patriot!
Exchange Privileges
Made 50,000th post!
Joined
Nov 14, 2022
Messages
5,045
Reaction score
5,034
Points
168
Location
Central Florida
Lee Pro Pot IV Electric Melter--Refurb and Evaluation...and the lead (leed) up.

I fix my own home appliances when possible. We have older units pre-Nobama efficiency standards that don't utilize the circuit boards of newer units so they can last decades with a part here or there. I have a scrapper guy Mike, that always has the washer and dryer parts I need. And other interesting items I've purchased from him over the years. His "compound" is about 7min from me. I texted him a picture of a dryer door switch I needed, he texted back "I got one, come get it, no charge". I text back "OMW".

3406102.jpg

It all started with a smaller gun safe for $10 at one of his bi-annual yard sales. It was locked closed but a casual shaking determined there was nothing valuable (heavy) like bars of gold, guns or ammo in it. I had a lock w/keys in my resource library, drilled the old brass lock out and installed new. Didn't really need it so sold for a quick $100 to get it out of the way. Looked like this:

stackon.jpg

I also got a '70 'vette painted ceramic decanter for $1--I thought it was cool. Gave it to my son for Christmas. Not his only gift, he was surprised and would never have guessed what it was. :)

vet1.jpg

Another time I texted Mike about a pump to pump out our pool which I do every 5yrs or so if needed. I used to use an old pool pump with a PVC downtube but that was a pain in the ass and required priming. And the motor went bad so it was time for a replacement. He had a couple pumps, "come on over". I ended up with a very nice sump pump for $25. Worked like a charm! We are high and dry so no chance of the pool "popping". Plumbed with 1-1/2 PVC out into the large back yard. The tree and grass loved what didn't quickly soak into the sandy soil.

pump7.jpg pump4.jpg pump6.jpg

Anyhow, when I picked up the switch, I asked him about if he had any lead (led) for a project I'm contemptating. "No, I just scrapped all of it. But I got the melter." We walked back into the compound to some random shed, he pulled it out and said "make me an offer", I happened to have a $10 bill in my pocket and he said "sold!" :) 
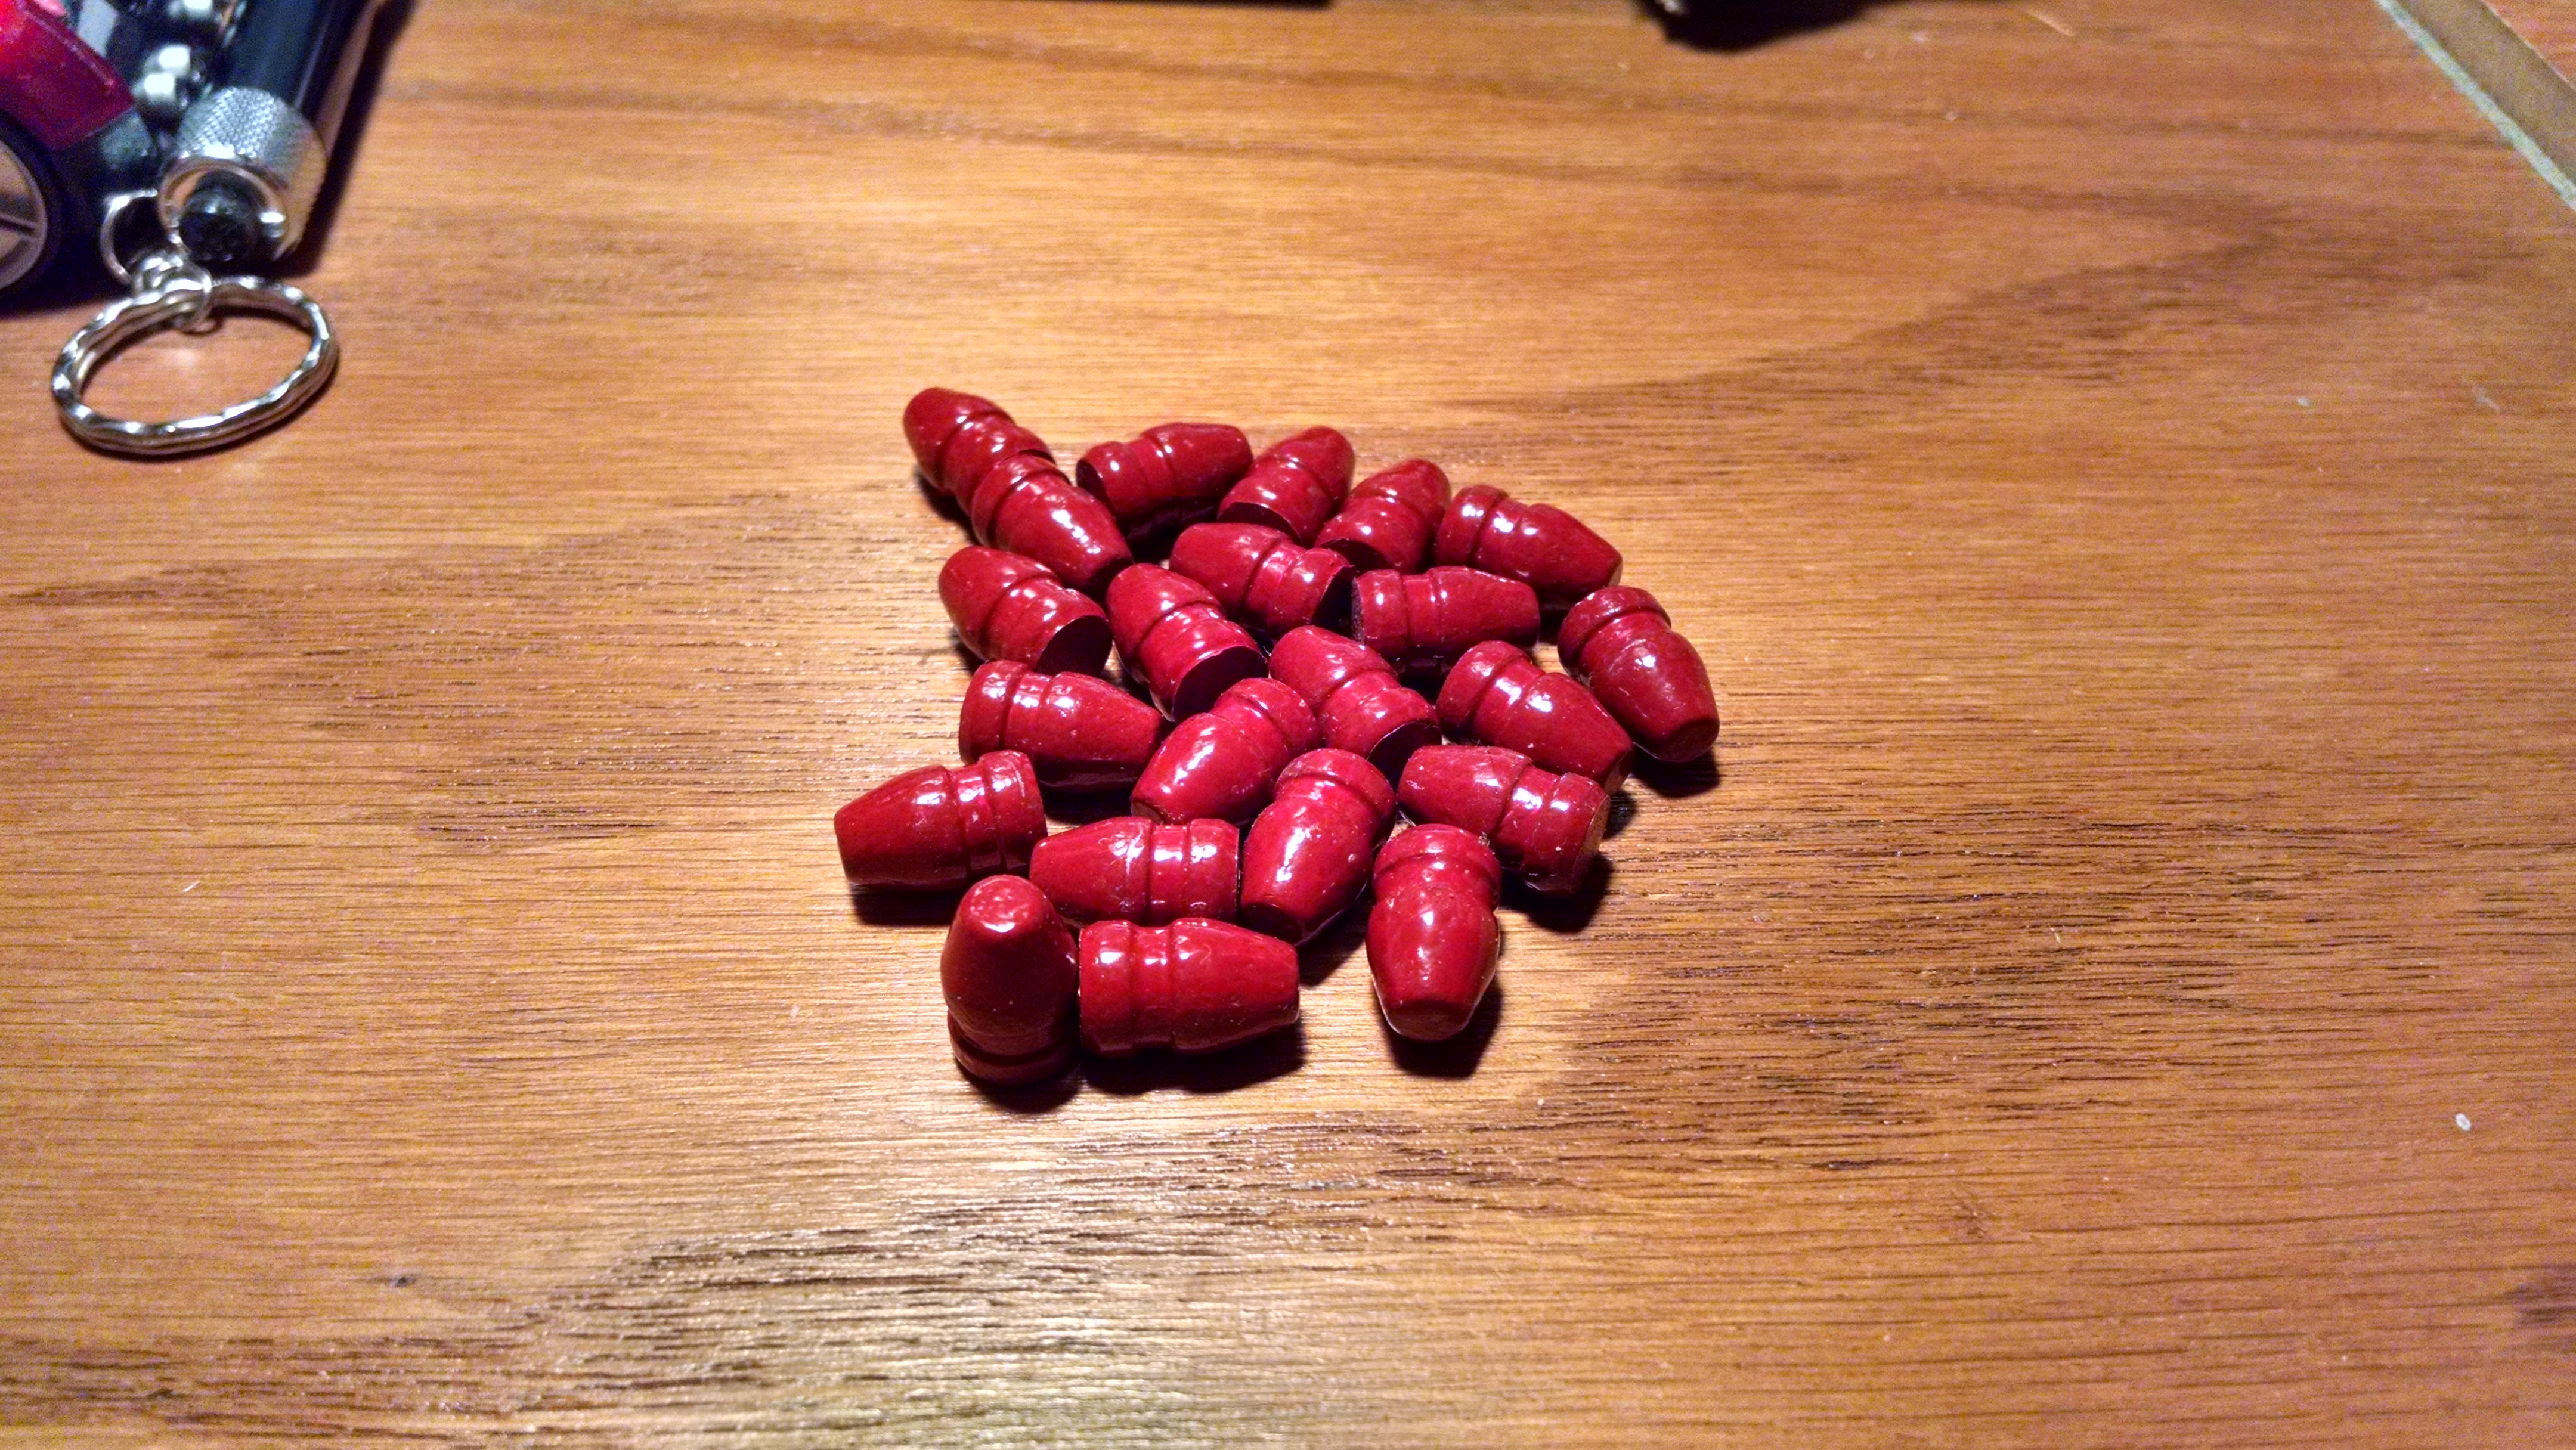
This is what it looked like when I got it. Even had some unmelted sinkers in it.

melter1.jpg

Back home, I took about 5min to give the melter a quick detail and dump and blow the pot. Couldn't tell what was in the pot so I took another 5min and scraped the crud off the top and there was what appeared to be lead in the pot.


melter2.jpg melter3.jpg

Plugged it in and it quickly started smoking/fuming from the pot :eek: and I figured it would be very prudent to move the operation outside. I let it warmup and smoke for 20min or so. Pulled an oddball spoon out of the silverware drawer that a kid's friend had left over a decade ago. Had an old muffin pan to dump the dross into.

melter4.jpg melter5.jpg

Scraping the inside beneath the lead it feels "crusty" and to get a better look I need to pull or drain the lead out. Unfortunately I couldn't unclog the bottom spout with a paper clip as suggested. I'll try again later maybe use a pin drill... (to be cont.)

PS: the way it works is you lift the counterweight and it pulls the rod up off the bottom where it uncovers a hole for the bottom spout, where lead goes into a bullet (or other) mold. Instructions attached.


View: https://vimeo.com/939555286?fl=pl&fe=sh
 

Attachments

  • EM1142.pdf
    1 MB · Views: 41
Last edited:
Usually when mine does this I take a propane torch and heat the drain.
Most of the time that will clear the drain.

To get the metal out of pot the pot I've used the torch and a channel lock
with long gloves to dump the pot.

The lee pots are tough. BTW 2 weeks ago I cast 3k of 230 gr 45 bullets
for 45acp brass that needed loading.
 
UPDATE--SUCCESS!!!

(con't)
Next step I tried to open the bottom orifice with a pin drill chucked in a cordless. I removed the base to do this (4 screws). I broke two bits :eek: using this method, but was fortunate that the stubs fell out of the orifice. 🤗 OK, that's not going to work... Put the base back on, plugged it in and let it heat up. I'm going to have to pour the lead out.

pindrills.jpg pinchucked.jpg

While it was heating up, I took an obsolete Al weldment I've been tempted to scrap for 20yrs and created a trough to pour the Pb into. Hopefully it would have enough volume. 🤔 A couple Al squares to cap the ends. The pour went OK with minimal leakage that easily scraped off the plywood. A small amount was left in the pot and I tilted the pot so it would harden away from the drain hole. That crustiness certainly looks scary! :eek: The lead hardened and cooled fairly quickly, creating a triangular rod about 32" long and 3lbs almost exactly.

pour1.jpg pour2.jpg pour3.jpg pour4.jpg

While lesser men would have tossed the melter into the garbage at this point, I figured I'd try scraping to see if the pot was saveable. đź’Ş I used a HF 3/16" screwdriver sanded into a point like a chisel. This screwdriver was part of a set that HF used to give away free with coupon. Along with the meters I'd probably given away a half-dozen of them. Someone asks to borrow a screwdriver, "here you go!" and throw them a set. :D

Anyway, within a minute or two, I determined the pot was saveable with most of the crust popping off easily. As I scraped, I rinsed/lubricated with denatured alcohol ("stove fuel") which created a pink/orange slurry dabbed up with paper towels. Eventually the remnant of the leftover lead popped off leaving a pretty good looking pot surface. :) I used a pick tool to pry out a "plug" from the orifice but it became apparent, the spout/orifice was going to need work.

scrape1.jpg scrape2.jpg scrape3.jpg scrape4.jpg scrape5.jpg

Both the pot and rod cleaned up well with green (kitchen) Scotchbrite. I also have white (softer) and maroon (more aggressive) I could use, too.

scrape6.jpg scrape7.jpg
Removed the base again, remembering to take a pic of the inside workings. Not much to it, power in to the rheostat and heating element--that's about it... It is "on" once you plug it in.

ori2.jpg

Broke out the pin drills again, this time only using as designed--by hand. ;) Spun that sucker probably 200 times before I finally made it through the pink/orange stuff and out through the other side! 🥳 And that has to be THE cutest drill index I've ever seen and probably the only time you'll ever hear one described as such. :D Regular size index for comparison.

Once through, I used welding tip cleaners in progressively larger sizes up to the max. Also used long tip cleaners (not shown) from inside the pot. Eventually I ended with a 1/8" bit inside (holding with vise-grips) and 5/64" in the spout outside using them as reamers. Ended up with a pretty decent orifice mostly free of the pink-orange material that had been blocking it. Plugged in the melter and let it start warming up.

ori1.jpg ori3.jpg ori4.jpg

As it warmed up, I cut the lead rod into ~4" chunks with side cutters and put them in the pot. It took about 15min for them to turn to liquid. A quick pull up of the counterweight and lead came right out! SUCCESS! :D I still need to get some wax to use as a flux to get any remaining impurities up to the top.

succ1.jpg succ2.jpg succ3.jpg

I don't have any molds yet but these are a couple pics of what some look like.

mold1.JPG mold2.JPG sinkermolds.JPG
 
Last edited:
OK, I have two of these Lee furnaces and have used them for 40 years.
They are reliable and can serve you well casting bullets.
The nozzle is going to drip. You can use a screwdriver in the slot on the pin, that's what it's there for, but dripping is a fact of life. Get used to it. Keep a pair of pliers handy to put the drip pile back in the pot.

Read up all you can on bullet casting. Lyman has a handbook with lots of good info.


Lots of things can be used for flux. Candles, bullet lube, beeswax etc. All of them work, but smoke a lot. This flux does an excellent job and doesn't smoke.

Get a thermometer and keep a record of each molds favorite temp. Using only one pot, you will have to add lead and flux frequently to keep the temp in the Goldilocks zone for that mold. If you have to take a break, put the mold on top of the pot to keep it hot.

For pistol bullets, wheel weights work well and can be had cheaper than buying ingots of bullet alloy for casting.
I recommend powder coating them for no smoke, no leading pistol shooting.
Wheel weight alloy can also be heat treated for cast rifle bullets.

hXxPTeg.jpg


Properly ventilate your casting work area. I set the pot up in front of a window in the shop with a box fan to pull the fumes out.
Do not eat or drink or smoke during casting. Avoid all hand to mouth contact.

And remember, you are the QA guy. If you accept less than perfect bullets, don't be surprised if the results are the same.
An experienced caster should only have about a 10% rejection rate.
Your bullets should come out fully filled out with sharp edges and no voids.
1761528440843.png


This is just scratching the surface on the topic of bullet casting. Read up and then ask your questions.
 
OK, I have two of these Lee furnaces and have used them for 40 years.
Thank you for the info! (y) I'm not necessarily into casting bullets YET, but my 85yo uncle has been wanting to give me his Winchester 1873 in 32-20 I refurbed for him about 10yrs ago. I'll have to dig up the video of us shooting it back then and make a gif since I can't post videos here. ;) Ammo is not readily available for it but I bought some reloads at a gun show and we shot up most of it and I kept the cases. A mold is about $35 and if I do ever get the rifle, I'll be thinking about making some rounds for it. The bore is somewhat toasty and accuracy is about pie plate at 50' at best. So it would become a novelty shooter probably broken out once a year for 50rds or so.

I did used to roll my own 45ACP using 185gr lead SWCs bought from a local store when I was up north. I tuned my Colt 1991 (80-series A1 clone) to shoot it with a lighter recoil spring and was able to get all in the black shooting NRA slow-fire 50'. Whether I would want to continue that is questionable as I'm mostly shooting factory 9mm out of convenience now...

The lead melter was definitely an impulse buy and labor-wise, I would have been better off buying a new one. ;) But I certainly enjoyed bringing it back to life. :) I will let Mike the scrapper know I'm in the market for lead and I'm sure he'll sell me what he acquires at a good price.

Regarding the 3lbs of lead in the pot, how much wax should I use? I picked up a pound of wax at WM for $4. Until I commit to bullet casting, I have a small "project" I'm going to cast this lead into keeping in mind I don't know what alloys are in it. So the Midway flux you linked to is not an option at this time. I DO have the art pencils and chart for testing hardness by "scratching" the lead. I also have this flux from an auction that came with a lot of old welding equipment. It is hard as a rock so probably going into the dumpster unless you think it could be used and I'll return the paraffin. ;) I also have some "good" plumber's soldering flux that could be used.
Thanks for your input!

gulfwax.PNG deadflux.jpg
 
Last edited:
Thank you for the info! (y)
My pleasure.
Ammo is not readily available for it.
Au contrare! Ammo is readily available from five companies. 32-20, like other obsolescent calibers are produced in batches about once a year. When it runs out, you have to wait for the next batch to be made or buy another brand.

but I bought some reloads at a gun show and we shot up most of it and I kept the cases. A mold is about $35 and if I do ever get the rifle, I'll be thinking about making some rounds for it. The bore is somewhat toasty and accuracy is about pie plate at 50' at best. So it would become a novelty shooter probably broken out once a year for 50rds or so.
Scrub the bore really well. You may find that the barrel is just got some leading in it.
If it still looks rough, look up "fire lapping". You may be able to improve it by this process. Also with cast, it's important to size the bullet to fit the bore. Many 19th Century calibers, especially ones that started as black powder, had much looser bore tolerances than today. Also consider powder coating as previously mentioned. No smoke from bullet lube, and no leading.
The lead melter was definitely an impulse buy and labor-wise, I would have been better off buying a new one. ;) But I certainly enjoyed bringing it back to life. :) I will let Mike the scrapper know I'm in the market for lead and I'm sure he'll sell me what he acquires at a good price.
You want lead with antimony and a little tin in it. Cable sheathing, babbet lead, and other scrap lead is too soft as-is, you'll have to blend it yourself. That's why wheel weights are the go-to solution. They already have the proper composition to make good bullets.
Regarding the 3lbs of lead in the pot, how much wax should I use? I picked up a pound of wax at WM for $4. Until I commit to bullet casting, I have a small "project" I'm going to cast this lead into keeping in mind I don't know what alloys are in it. So the Midway flux you linked to is not an option at this time. I DO have the art pencils and chart for testing hardness by "scratching" the lead. I also have this flux from an auction that came with a lot of old welding equipment. It is hard as a rock so probably going into the dumpster unless you think it could be used and I'll return the paraffin. ;) I also have some "good" plumber's soldering flux that could be used.
Thanks for your input!
When using any type of wax, a piece about the size of a pea is about right for a pot full. If you use too much, it will just smoke more, won't hurt anything. If the lead you get is real dirty, you may have to flux and stir more than once to get all the impurities out.
As far as the other fluxes go, try it. The harden flux was probably powdered when new. Bust up the hard flux into chunks and toss a piece in. The Midway flux is powdered, but will harden like this with age. I just take a screwdriver and break it up. Still works the same.
 
Ammo is readily available from five companies. 32-20, like other obsolescent calibers are produced in batches about once a year.
I was aware of that. I suppose if I could get it for $1/rd that would be agreeable. I think the reloads I bought were about .80/rd. And I say reloads but the brass looked new and they used jacketed bullets. In the grand scheme, 32-20 dies are probably $30-$40 if I can find them, then components, so bullet mold is another $30-$40 if I went that route. Certainly easier to buy a $100 box of ammo and call it a day.
Scrub the bore really well. You may find that the barrel is just got some leading in it.
This is just a snip of the bore scope video and doesn't do the video justice. The video shows the bore is far from shiny, very grey and very pitted. When I get the rifle, I'll work on pushing a bullet through and measuring the OD. Maybe powder coating is the way? 🤔

73bore.JPG
When using any type of wax, a piece about the size of a pea is about right for a pot full. Bust up the hard flux into chunks and toss a piece in.
I'll take a better look at the old flux I have. I think it is more for soldering and I'm itching to toss it as I have newer stuff on the shelf. ;) I'd like to return the wax because I don't have a use for a pound of it. :rolleyes: I have a small half-burned hurricane candle (unscented) I can use.

The gun in question and the safe mentioned earlier and its contents once opened. :)

winnew6.jpg 10bucksafe.jpg 10buckcontents.jpg
 
When I use paraffin for flux and it smokes I ignite the smoke with a torch.
That cuts the fumes a lot. Also when I process wheel weights, I smelt them
outside and flux the melt several times. This makes for excellent alloy. I use
a cast iron pot for the melt and a propane burner, skimming clips and trash
from the melt.

Locally, wheel weights are only about 40% useable lead alloys by weight.
I need to research zinc weights for cast bullets. They are there in quantity.
 
Last edited:
Created a Mold!
I took some aluminum scraps and decided to make a cylindrical mold. About 4" in length, two 1-1/4" x 1/2" and one 1" x 3/8". Laid it out in my head and marked for drilling. I used pins to align the mold halves. I couldn't find any solid pins so used some 1/8" x 1" roll pins instead. I ran them chucked up against the sanding belt then deburr wheel so one side would allow for easy mold half removal then installed.

mold1.jpg mold2.jpg mold3.jpg

Then marked, punched and drilled to 5/8". Went 1/8" to 1/4" to 3/8" then 5/8".

mold4.jpg mold5.jpg

Now for the base plate. Drilled/tapped/countersunk 8-32 since I had the screws. Turned the melter on to let it warm up. Fluxed with some of the hurricane candle wax.

mold6.jpg mold7.jpg mold8.jpg

The pours went rather well and rather quickly. After half the base screws were removed, the mold halves unclamped and easily spread with the putty knife, the cylinders dropped right into the pan. I'll need to make a base for the mold so I can have better control over the pour. I was going to scrape the excess off the top with the putty knife but it hardened a little quicker than I expected. And the lead "sucked in" as it cooled and retracted.

mold9.jpg tools.jpg leadcyls1.jpg leadcyls2.jpg

I'm going to try a Surform tool to see if it will easily shave the excess. I'm also going to see if I have a 5/8" reamer to clean up the holes because although they look good, the lead picked up every imperfection... The 10 cylinders weigh 25.6oz/727g/1.6lbs so probably about 72g apiece after trimming. Anyone venture a guess what they are for? ;)
 
Off the top of my head I'd say maybe a 60 caliber projectile or if you're froggy a 20 gauge slug that weigh's 1100grains +/-. (but dang, a 2 and a half ounce slug is a bit much)
 
Last edited:
@serger Since you're the only one that ventured a guess, I'll give you a little preview of what the slugs are for... :D I'm calling them slugs but I don't intend to Taofledermaus them in any way. So your guesses were wrong... ;)

The Surform worked well for shaving the slugs down to size. I used the mold to hold them. They are just about 5/8" in dia. by 1-1/4" tall. Dressed the ends and edges with a file, then clear-coated them to make them safer to handle. Added a little felt pad on one end and got a couple little pieces of 1/4" plastic tubing. 🤔

slug1.jpg slug2.jpg slug3.jpg slug4.jpg

I'll update with measurements and such but here is a hint.. :D

andy.jpg slug5.jpg
 
Back
Top