Question Who's building something RIGHT NOW?

have you ran an anodized ar-15 lower through the gg3? if so, what technique did you use so the machine was able to find it's probe points? I ran my first ar-15 bare metal lower through it and tried to keep track of the probe points. I haven't attempted to run my anodized lowers for fear of ruining them. I'm trying to find a solution to milling an anodized lower through the gg3. I'm thinking about sanding off the coating where the probe points are. Otherwise, I'll have to purchase bare metal and try to find a business close to where I live that can coat the lower. I've built (4) 9mm compacts. Had 1 issue with rear rail alignment and thankfully with the help of Marine Gun Builder videos was able to fix it. Just yesterday I test fired it and now have an ejection issue. I think I'm going to swap out the ejector housing and ejector to see if that resolves the issue. I tried the P80 brand LPK, and in my opinion, the ejector housing and ejector is not too good. I've got (4) 9mm compacts milled and (6) blank 78% frames remaining. I saved those for last since they'll take a bit more time and effort to complete ( i wish there was cut code for 78% and 76% frames).
Welcome to the forum, user03091975! 🍻
 
Just about ready to start my 22lr pistola. Still procrastinating about a trigger. I have several mil spec triggers, but I've heard a lot of good things about LaRue and have never tried one before, so am really leaning that way.
1000019088.jpg
 
nice
 
Last edited:
Has become my favorite grip. Often soldout, got lucky was able to order from shooting surplus, but also sold-out as of today.

 
Has become my favorite grip. Often soldout, got lucky was able to order from shooting surplus, but also sold-out as of today.

I went ahead and just pre-ordered from DFCO. I like that he says he'll ship pre-orders before sending out in stock messages.
For what it's worth, Ranier Arms claims to have them in stock, but I put Ranier in the same category I do Polymer80, I know I'll get it, but they're not always truthful about availability and shipping times.
Besides, I had to get my daughter-in-law, who is a chef a Chef tee shirt.
 
Last edited:
450 Bushmaster AR, rebluing one on my AK47 builds , just finished rebluing a 1950 Winchester 94 30-30. 😏
 
Started putting the M4gery together. I've only had the PSA "M-4" bare lower since July... :rolleyes: Used "cast-off" mil-spec parts from other builds. I've got a carbine upper to dig out and install. I'll update with pics of the completed rifle.

m4gerylwr.jpg
 
@Bobster you come up with some great names, M4gery might be the best so far. Put some gold parts on it, call it the M4gery Kabling. 😜
 
@Bobster you come up with some great names, M4gery might be the best so far. Put some gold parts on it, call it the M4gery Kabling. 😜

Maybe I'll call it "M4orkinit" because it is done? 🤔:LOL: Seriously, other than the super-long 16" barrel messing with my OCD, this one will go to the range, get a box or two put through it to check function and to sight it in, then that will be it. :)


m4orkinit.jpg

Slapped this newly acquired 300BO upper on my trusty Anderson lower (my first lower assemble about a decade ago). The upper has a pistol gas system on a heavy barrel and the lower a sweet 2-stage trigger. It will be interesting to see if it functions with subs as it is supposed to. Looking to make a host for a can and I've a cheap scope and rail for a bipod to put on it. I'll call it "Silent Sniper" or maybe "300 BlowOut". Since you like my names, what do you think? :D

300blowout.jpg

Researching trusts at the moment to register the can under. Maybe I'll SBR the M4orgery so I can sleep at night... ;)
 
Last edited:
Maybe I'll call it "M4orkinit" because it is done? 🤔:LOL: Seriously, other than the super-long 16" barrel messing with my OCD, this one will go to the range, get a box or two put through it to check function and to sight it in, then that will be it. :)


View attachment 17109

Slapped this newly acquired 300BO upper on my trusty Anderson lower (my first lower assemble about a decade ago). The upper has a pistol gas system on a heavy barrel and the lower a sweet 2-stage trigger. It will be interesting to see if it functions with subs as it is supposed to. Looking to make a host for a can and I've a cheap scope and rail for a bipod to put on it. I'll call it "Silent Sniper" or maybe "300 BlowOut". Since you like my names, what do you think? :D

View attachment 17111

Researching trusts at the moment to register the can under. Maybe I'll SBR the M4orgery so I can sleep at night... ;)
I like 300 BlowOut! Name your trust Muffin M4Gery, you'll get to engrave it on everything you build!
 
have you ran an anodized ar-15 lower through the gg3? if so, what technique did you use so the machine was able to find it's probe points? I ran my first ar-15 bare metal lower through it and tried to keep track of the probe points. I haven't attempted to run my anodized lowers for fear of ruining them. I'm trying to find a solution to milling an anodized lower through the gg3. I'm thinking about sanding off the coating where the probe points are. Otherwise, I'll have to purchase bare metal and try to find a business close to where I live that can coat the lower. I've built (4) 9mm compacts. Had 1 issue with rear rail alignment and thankfully with the help of Marine Gun Builder videos was able to fix it. Just yesterday I test fired it and now have an ejection issue. I think I'm going to swap out the ejector housing and ejector to see if that resolves the issue. I tried the P80 brand LPK, and in my opinion, the ejector housing and ejector is not too good. I've got (4) 9mm compacts milled and (6) blank 78% frames remaining. I saved those for last since they'll take a bit more time and effort to complete ( i wish there was cut code for 78% and 76% frames).
Hey brother, sorry for the late response. I was cruising through the Mexican Riviera for 2 weeks during the holidays.

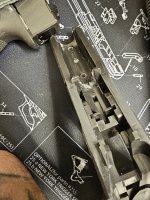
So I'll start out with the Fk up. The first thing I ran through it was an anodized AR-10. I did nothing to prep the frame. I have a tendency to read the first few instructions, and go to town. I ended up with a frame that the opening for the trigger was about 1/4 inch wider on the right side.

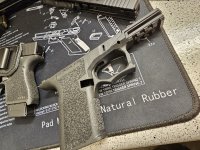
So what you have to remember is the machine takes 4, or 7 reference points. And it takes them with the bit installed. The points are: the center of the groove in the mag well, then it checks the top and the bottom of the mag well, then it checks the top of the frame. The area is just to the left of the bolt catch With those 3 points it calculates everything else, so if they are off, you are going to have issues.

The bit doesn't travel far enough to penetrate any sort of finish on the lower. If it is anodized, cerekoted, whatever, you wont get a good read, or the machine will keep stopping.

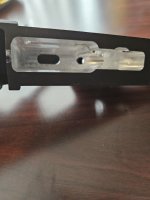
You have 2 solutions. 1. You can remove the finish in those areas. I took a Dremel with a small abrasive bit. I'll post a pic. It doesn't have to be much, and as hard as it may be to remove the finish remember its in the Mag well, and the one on top will mostly be removed when the machine cuts out the trigger area.


I said there were 7 areas. The last 3 are if you want the machine to drill your pin holes, and your safety selector hole. I myself would rather do that by hand. I have really good jigs I have used many times and have never had an issue. Plus if you use the GG3 you'll need to remove it from the jig and mount it sitting up, But if you still want to do it you need to remove some of the coating in the area where the grip installs. the flat side, and then the area where the detent goes all the way down until you get to the end of where the hand guard sits...Again its painful, but it all covers, or you can touch it up later.

As for Option 2. if you don't want to remove the finish, you need to apply a thin copper tape. Basically instead of using the frame itself, you put thin copper tape, Think like gold leaf, on the areas I mentioned. It is very thin, but you have to make sure you don't attach the sensor to the bottom with the pistol screw that holds the pistol grip. Make sure all the tape is touching and attach the sensor to the side where it wont interfere, but it has to attach to the copper.

Now if you just run plain aluminum non-coated lowers...you don't need to do anything.

The Black one is the 1st one I did...I ran it twice and it helped, but its still heavy on 1 side. the FDE I did and it worked flawlessly. Just follow the spots where I removed the finish on the fde, and you'll be fine...Hope That helps you
20240114_112209.jpg
20240114_112203.jpg
20240114_112148.jpg
that helps
20240114_112209.jpg
20240114_112203.jpg
 

Attachments

  • 20240114_112134.jpg
    20240114_112134.jpg
    1.9 MB · Views: 51
Last edited:
So BlowOut needed a pictinny rail on the hand guard to attach a bipod. The kit shown was a zamazom special for $12 or so. The segments are made of aluminum and really well done. Only one small section is included :( so the rest will go back in stock. Includes a bunch of M-Lok hardware and half-dozen Allen keys. Unfortunately, the screws were a little long for my application and could defeat the purpose of a "free-float" barrel as clearance was only about 1/16". :rolleyes:

300borail1.jpg 300borail4.jpg

To shorten the screws, I put some washers and a nut to get me close to the length I needed. I sanded them on a horizontal sanding belt, 120grit. Using a wrench along with the washers to hold it, I ground the end of the screws down until I could no longer hold them because of the heat, then I would switch to the other screw. Then I dressed the ground edges on the belt (now stationary) and finished with the deburr wheel. A couple drops of Loctite and they fit perfect with no excessive protrusion. Hard to tell by pic, but finished screws shown installed above (300borail4).

300borail2.jpg 300borail3.jpg

I've had this (cheapie) Simmons Whitetail scope (and glare tube) kicking around for quite some time, looking for something to put it on, and BlowOut was the lucky winner! :D Mil-dot reticle, I forget the magnification but it is a lot. Mounted on 1/2" risers, the eye relief and height are perfect for me with stock extended and no cheek riser necessary. I've never used it so I'll have see how it works at 100yds. I know the scope looks goofy but the hand guard was made for it! :love:

300bosim1.jpg 300bosim2.jpg
 
Currently working on the channel for the 940c.. once this is complete I'll be doing the G17 next..
 

Attachments

  • 20240124_153152.jpg
    20240124_153152.jpg
    2.3 MB · Views: 60
  • 20240124_153139.jpg
    20240124_153139.jpg
    7.5 MB · Views: 57
Currently working on the channel for the 940c.. once this is complete I'll be doing the G17 next..
What are you using to hog out the channel? Before I invested in a flexible bit attachment for my Dremel to make it easier to get in there, I used a round file with painter's blue tape wrapped around it strategically so I wouldn't inadvertently remove material from places I didn't want to--only from the channel obstruction.
 
What are you using to hog out the channel? Before I invested in a flexible bit attachment for my Dremel to make it easier to get in there, I used a round file with painter's blue tape wrapped around it strategically so I wouldn't inadvertently remove material from places I didn't want to--only from the channel obstruction.
I'm just using wire/jewelry cutters to haul out the majority of it. Then I'm gonna get in there with a dremel to get the edges/rest of it. Would prefer to hand sand the rest of it out as it makes it easier for me to go slow and not fuck anything up but don't think I have proper files/sanding tools to do so for this.

I've done 2 g43's before this and used cutters and hand sanded the rest in those channels but the material in this 940c seem to be a little more difficult with the cutters but is manageable..
 
Back
Top