Tip! Alternate Tab Removal Method

I'm doing a build on the pf940c right now and just taking my time. I work on it when I'm bored. Kinda why I got em other than I love doing this. After reading in here and watching MGB videos like 5 times each I don't remember him ever saying to score before using Fret Cutters. I just spent $62 on Hosco Fret Cutters which will be here tomorrow and after reading this I pulled my Xacto set out and took all 4 of my tabs off perfectly flush in 10 minutes maybe less. I have a pf940SC I'm doing next and I might just use a regular box cutter but the Xacto knife did a wonderful job, I just need to do some clean up for that "First Time Quality" job.
What I'm worried about is doing the channel. I was already going to use my xacto knives to make the final cuts, I was going to use the Hosco Fret Cutters to get it started but I read in here that they push the towers in the Channel. Now I'm a little bit afraid to do it this way but If I don't go perfectly flush against the towers and get super close maybe I can just use the dremel to get the rest off. If I do use the Fret cutters for the Channel the final cut will be with my Xacto then I was going to make the relief cuts in the bottom of the channel and use the mini Fret like Cutters I found at Harbor Freight to nip the rest away. The Channel worries me the most, it's the one thing I am afraid to mess up on.
I have been reading these forums as much as I can, is there a post on the easiest way for the Channel? That's all I need to do on this PF940C to assemble, besides wet sand after the Channel and tabs.
I thank you for mentioning using a box cutter or xacto knife as it came out super clean. My tabs should clean up super easy. I fit my front and rear locking blocks in just now to see how I lined up and everything looks perfect!!!!!!! Super stoked! Hoping you guys know the best way for this!

1 more thing I was about to order the 47021 ejector from ebay but I'm noticing the entire housing with Ejector is $9.99 online it's just sold out everywhere except 1 website I found. The 47021 ejector is thee best way to roll right? Just making sure! I also bought a lone wolf extractor plunger, spring and bearing on accident from ebay while I was picking up some polish and a new back plate as I have an extra stock glock 19 slide from my stock glock 19 I bought a while back, I was going to put the stock firing pin and stock extractor plunger back in the stock glock slide and use the lone wolf titanium firing pin and assembly with the extractor plunger assembly in my Faxon Hellfire slide with the PF940C I'm working on right now. Super excited to get this finished, just my first time doing first time quality and everything right! Any suggestions, I thank you all for in advance!
 
The Channel worries me the most, it's the one thing I am afraid to mess up on.
I have been reading these forums as much as I can, is there a post on the easiest way for the Channel? That's all I need to do on this PF940C to assemble, besides wet sand after the Channel and tabs.

I used the Dremel to start and remove 98% of the channel block. Then I go to the "Micro-Sander." After than... rubber points.

Here's video of how I do it. Skip up to 6:36.

View: https://rumble.com/vs3e16-using-a-micro-sander-for-p80-frame-and-channel-finishing.html?mref=wdrri&mc=9kvnk
 
And I do it differently myself. I cut as much out with a set of homemade mini fret cutters then I finish removing the rest with a machinist's triangle scraper.

As you can see there are definitely more than one or two ways to remove the tab and finish the channel. Use what ever method works best for you and produces a nice clean and smooth channel.

Yep. I'd say that "magic ingredient" is: Take your time! Go slowly! Little bit at a time.
 
Shooter- 47021 ejector for gen 5 will work fine as long as it's put in a gen 3 housing or modified gen 4 housing. Here's a pictorial of ejectors for P80s ...future ref
Gen 4 housing mod
G3 vs G4 trigger housing cut.jpg


I also like and recommend Corys method & @no4mk1t tab removal methods for both channel & tabs.
I like @Racer88 vibrating sander tool but I'm too cheap to buy something I can do with tools I already have. So I file/hand sand then polish with my Dremel to get it FTQ. Those cerakote wipes are pretty nice !

Try all the methods then select the one or combination that works best for you.

Note: Suggest when using the cutters on the tabs not to cut flush with the frame. Score a cross the full length with the cutter just above the frame leaving a bit proud to sand/file off them polish.
 
Gen 4 housing/ejector

Gen 3 housing/ejector

LWD gen 4 ejector only- swap out for gen 3 #336. Tested by community it does work
 
I can vouch for the LW (OEM 30274 clone) ejectors that Michele linked. They install just fine in an OEM trigger block, and are as good as, maybe better, than OEM. At least they are polished. I've installed about 4 or 5 of them.
 
I used the Dremel to start and remove 98% of the channel block. Then I go to the "Micro-Sander." After than... rubber points.

Here's video of how I do it. Skip up to 6:36.

View: https://rumble.com/vs3e16-using-a-micro-sander-for-p80-frame-and-channel-finishing.html?mref=wdrri&mc=9kvnk

Loved the video...I might have to get a set of those micro sanders! I think I'm going to try fret cutters but just not right against the posts. Then make those relief cuts and pull what I can out. Next build which I have a sub compact waiting I'll try the microsanders for sure!

Super nervous about my tabs. I cut them off while still in the Jig. It's like there's nothing left. It was cut all the way across. It's clean but I'm not sure If I should take the metal files like MGB used to sand out the edges or if I should wet sand them in with like a 240 grit or something, it's amazing how clean they cut. There will be some flaking but that's all, no little nudges of anything, the tabs seem to have come off 100% so I'm just worried about going down too far!
 
Just drink a whole bunch of caffeine and then pick up your existing tools! ;)
Dude I would be shaking to death...I have permanent nerve damage which sucks, broke my back 2 weeks after turning 21. Major back surgery made it hard to keep a steady hand without a few puffs. LoL it's why I am so nervous to use the dremel to sand my rails because their so damn flush the entire tab just popped off lol...maybe I have a good amount of room to work I just don't want to take off too much. Wet sand by hand might take forever and a day...maybe do like 400 and 600 and move to the hard white bits I think are the same for polishing metals as well...that seems course enough to take off or help flake off and blend some of it but I might be way too early for that. Maybe I should go in the order mgb did, I just wasn't sure what he used after the metal bits, i think it was the hard white bits. Then he went to black, I have black, flitz and the white tub with red label I forget the name 😆 but it's just that after polish.
 
20220518_222845.jpg


Ok so this is my first time trying to go pretty. The Xacto did such a good job on the tabs I used the metal grind bit he uses in tabtastic, to get it smooth without the little flakes and then I rubbed some black in, used a Impregnated buff and some greens to get smooth. Hit with black again but it didn't do much. It feels good...I feel like I need to do a wet sand to get it looking proper. Must I go down the entire rail?
Channel will be tomorrow!
 

Attachments

  • 20220518_222824.jpg
    20220518_222824.jpg
    1.7 MB · Views: 187
View attachment 3083

Ok so this is my first time trying to go pretty. The Xacto did such a good job on the tabs I used the metal grind bit he uses in tabtastic, to get it smooth without the little flakes and then I rubbed some black in, used a Impregnated buff and some greens to get smooth. Hit with black again but it didn't do much. It feels good...I feel like I need to do a wet sand to get it looking proper. Must I go down the entire rail?
Channel will be tomorrow!

Those tabs look good from here! Nice job. As long as they're smooth, you're good to go. How shiny you want to make them is a matter of personal taste. Once the rails are installed, you can't really see it anyway.
 
I try to make it look like the rest of the polymer that hasn’t been touched. Michele likes shiny. Hehe. “Shiny GOOD!” Hehe

I’ve got to find/get some of those Cerakote wipes, as I’ve done everything including the mineral oil overnight and ‘meguiars black’ follow-up, but still am missing something. I just remembered the Cerakote as I was reading Michele’s comment. Maybe that’ll do it. :)
Wet sanding with 1000 grit to remove scratches helps. It’s the scratches on plastic that cause the whitish appearance…like dull plastic head lights.
Check out @Callducks7 helpful tips on this thread Here👈🏼

Cerakote wipe buy link is on Corys channel method. Found in the resource center and also listed with MGBs videos
 
Look pretty darn good to me 👍🏻 
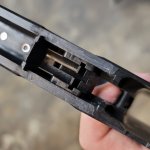
I like mine shiny so I polish everything. But that’s my personal taste.
Yes I am a perfectionist with a slight bit of OCD. So far this looks better than I expected but I want it to look like it was never cut, like they were never there! I'll take some 1000 grit sand paper to them, should I soak the sand paper in water and wet sand Michele or should I just dry sand it? Also MGB says to go all the way down the rails, like where the tabs were not even at, is this necessary? Going to check out the link you left to Callducks post! Thanks Michele!

Going to drill my holes for the PF940SC in OD Green! I only do a 4mm for the front locking block/rail and the 3mm in the rear for the rear locking block/rail correct? It came with a Jig that looks like the pf940c would come in with a 3mm and 4mm where the front locking block/rails are. From what I seen on the internet, seems like a 3mm in the rear and 4mm in the front.

Thank you all so much, it's nice to have friends here who can give advice to help...I only hope I can help you all some day!
Wet, wet, wet with whatever you use when finishing. That includes diamond bits, sanding, polish bits etc…If you try the green polish bits soak those in water. May want to take a quick look at MGBs polish video if you want to OCD out on polishing your build. It’s #9 on the video list.

Is all the polishing to make the frame look like the rails and channel were never there necessary ? Umm that depends on how OCD you are with FTQ.😂 For me the answer is a resounding yes of course 😊. Is it required for everyone , no. The rails and channel should be clean enough and free of material so the RSA and slide will function properly and safely.

You choose how much effort to put into your build. If it’s a weapon that functions safely, that you are proud to own and show off when your done…that’s the goal.
 
Last edited:
Wet, wet, wet with whatever you use when finishing. That includes diamond bits, sanding, polish bits etc…If you try the green polish bits soak those in water. May want to take a quick look at MGBs polish video if you want to OCD out on polishing your build. It’s #9 on the video list.

Is all the polishing to make the frame look like the rails and channel were never there necessary ? Umm that depends on how OCD you are with FTQ.😂 For me the answer is a resounding yes of course 😊. Is it required for everyone , no. The rails and channel should be clean enough and free of material so the RSA and slide will function properly and safely.

You choose how much effort to put into your build. If it’s a weapon that functions safely, that you are proud to own and show off when your done…that’s the goal.
Thanks Michele! You are always helpful with the info. I saw the polish video where MGB does the underside of the trigger and didn't even think to myself that applied for the entire weapon! I'm gonna wet some 1000 and up sand paper and try to get that smooth mirror like finish as much as I can! Didn't know everything was supposed to be wet when sanding or taking anything down. I have my greens still in water as I was going to build today and said to myself might as well leave em, 2 days soaked I'm sure their fine. I'm just really glad you said everything even diamond. I'm actually really having good patients and just taking my sweet time. I'm in no rush. Channel tomorrow night, going to use fret cutter by Hosco before I return it to get my tabs. I was going to buy the bit I forget what number the best one was, saw someone saying it was the best here in the forums. Makes me wanna buy the vibrating Sander like Racer88 has.
The channel makes me nervous, I do think I should get a good bit to either sand it out or be able to drill it, saw MGB video on drilling a hole first in the Channel. So many options, just want what comes out cleanest and best.

Thank You for all your help, I feel so much stronger having you all. Love the community so far. Gratitude!
 
I see this thread has exceeded 1K views.
Has anyone used the Dremel router bit on their tabs? Just curious. :unsure:
 
Not yet but I mean to. My fret cutters were too wide for the front tabs on my SC/26 frames so I used an abrasive wheel to chop them off, much like Racer88 did with the saw blade in the second post in this thread, but I was hesitant to get close so I left more than I prefer for the nail files. Got a couple C/19 frames to do and haven't checked if fret cutters will fit those. Should get that 650 bit.
 
Back
Top