How bout making a rear sight with files and calipers for a Browning Hi Power (left) back before there were aftermarket sights available?You guys really need a challenge!!!


How bout making a rear sight with files and calipers for a Browning Hi Power (left) back before there were aftermarket sights available?You guys really need a challenge!!!
Nothing wrong with a challenge.. just trying to cross the T's and dot the I's.You guys really need a challenge!!!
I suppose I have never really respected plastic. It's freaking plastic. It's probably why I like it so much for my guns because I don't care if they get beat up. All of my nice wood and steel guns get babied because they're too beautiful to take out and drag through the woods. Even the utility grade ones need attention. Fresh linseed oil every decade or so, making sure oil isn't saturating the wood, making sure the metal under the wood isn't rusting etc. I hate cleaning anything. Most of my modern guns get cleaned every few thousand rounds unless they get crapped up from filthy powder like Longshot or lead coiling out of the barrel.Nothing wrong with a challenge.. just trying to cross the T's and dot the I's.

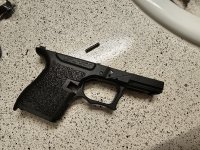
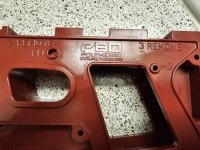
Naaaa... frame is salveable! Just ask @Michele! She's the master of fixes!Welp.. after using the 5/32 bradpoint drill bit to drill out the trigger pin hole I noticed that the trigger pin slides right on thru like a hot knife thru butter which I'm assuming shouldn't happen.. so I guess I'll be ordering a new frame and starting over.
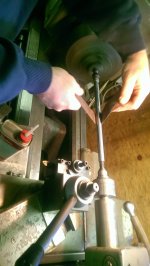
Side note: I used a dremel press for the trigger pin whole, which isn't very sturdy btw and a hand drill for the rear pin hole..
Probably should have just used the bits that came with it. Fill them with JB weld and use a cordless drill with the supplied bits like you were supposed to instead of getting all fancy. Besides when it's all assembled there should be enough pressure to retain it as is.Welp.. after using the 5/32 bradpoint drill bit to drill out the trigger pin hole I noticed that the trigger pin slides right on thru like a hot knife thru butter which I'm assuming shouldn't happen.. so I guess I'll be ordering a new frame and starting over.
Side note: I used a dremel press for the trigger pin whole, which isn't very sturdy btw and a hand drill for the rear pin hole..
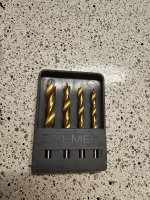
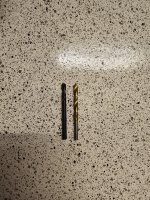
I agree, a 5/32 is suppose to be a bit smaller than the one they send you.. it kinda seems that the bradpoint which is on the right is a bigger than the one in the box.. guess that's the way the ball bounces haha. I already ordered a new frame but I'll JB weld this one at some point and keep it as a special ed projectProbably should have just used the bits that came with it. Fill them with JB weld and use a cordless drill with the supplied bits like you were supposed to instead of getting all fancy. Besides when it's all assembled there should be enough pressure to retain it as is.
I ran it a couple times to make sure it was seated. I will say the base to the dremel press isn't the best and it was a little wobbley so I had to hold it to keep it steady so maybe it that affected the out come.. I used a cordless drill for the rear and that seemed alot easier.Naaaa... frame is salveable! Just ask @Michele! She's the master of fixes!
I wonder if the bit wasn't seated and running true before you drilled. I often have to re-seat the bit to get it to run true. I always turn it on and watch the bit to see if there's any "run-out" before I drill. If I do, I loosen the collet and re-seat the bit and re-tighten and check again.
5/32 is 3.97-mm. So it's slightly smaller than the 4-mm bit. In my experience it makes for a pin fit that is a bit tighter.I agree, a 5/32 is suppose to be a bit smaller than the one they send you.. it kinda seems that the bradpoint which is on the right is a bigger than the one in the box.. guess that's the way the ball bounces haha. I already ordered a new frame but I'll JB weld this one at some point and keep it as a special ed project
The way it was intended to be done. The few thousandths of offset between the holes helps retain the pin.I ran it a couple times to make sure it was seated. I will say the base to the dremel press isn't the best and it was a little wobbley so I had to hold it to keep it steady so maybe it that affected the out come.. I used a cordless drill for the rear and that seemed alot easier.
I will say the base to the dremel press isn't the best and it was a little wobbley so I had to hold it to keep it steady so maybe it that affected the out come..
Well after accessing the jig again and comparing the two holes I'm gonna say it's safe to assume that the dremel press had some wobble in it as it seems to have drilled off centerYeah.. it shouldn't be wobbly. And you shouldn't have to hold it to steady it. But, that might explain the loose pin holes.
The Dremel Workstations are known to have loose screws. Go over the whole thing and tighten all the screws. Then take a peek at a video I made.
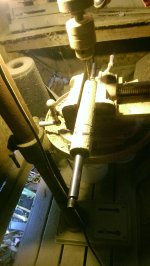
. While the rear is straight thru with a cordless hand drill...Going to be sticking to the cordless hand drill for now on.The way it was intended to be done. The few thousandths of offset between the holes helps retain the pin.
Yeah.... looks like it went off-track there:Well after accessing the jig again and comparing the two holes I'm gonna say it's safe to assume that the dremel press had some wobble in it as it seems to have drilled off center
Repairing pin holes with JB is not something I’d recommend , it will eventually fall out due to lack of surface area and not enough anchor tooth. JB weld is ok for large repairs with little to no stress. It’s great for customizing black frames.Welp.. after using the 5/32 bradpoint drill bit to drill out the trigger pin hole I noticed that the trigger pin slides right on thru like a hot knife thru butter which I'm assuming shouldn't happen.. so I guess I'll be ordering a new frame and starting over.
Side note: I used a dremel press for the trigger pin whole, which isn't very sturdy btw and a hand drill for the rear pin hole..
Super simple fix.. I ordered a new frame but will def try this out! Would grounding up some of the polymer tabs and throwing them in too be a good idea too I'm assuming??Repairing pin holes with JB is not something I’d recommend , it will eventually fall out due to lack of surface area and not enough anchor tooth. JB weld is ok for large repairs with little to no stress. It’s great for customizing black frames.
My top recommendation is using superglue and baking soda for pin holes. There is a chemical reaction that melts the material to the polymer. . Color baking soda same color as frame. Can use most any paint as colorant. I use spray paint or acrylics. BTW, I repaired a frame cut in 1/2 using super glue & B.soda it works just fine.
It’s nearly as good as filling the holes with melted channel/tab parts which is my 2nd recommendation
Here’s the resource center how to do repairs on p80 frames
U mean toss some tab dust into the super glue concoction? Don’t know but you could do a test and see what happens. Don’t see why it would not work, dust should melt soon as the super glue touches the baking soda…the chem action takes a 1/2 second and it’s hard as a rock. Can drill immediatelySuper simple fix.. I ordered a new frame but will def try this out! Would grounding up some of the polymer tabs and throwing them in too be a good idea too I'm assuming??
The Potatoes:
Ok ladies and gents, from a pure engineering perspective the old "more than one way to skin a cat" literally applies here. MGB put out a road map that covers 95-98% of a SAFE and accessible way for a home builder with sub par to average hobby skills, with average low cost tools, (and a tad bit of common sense) to build a really decent quality firearm.
Now that road map is no different than any other in that there are many more than one way to get to the destination. Some shorter or longer, some scenic or less so. We all have a base of what works, just different twists on what works better for each individual knowledge, skill level and actual tools available or in the budget to purchase. So no need to pooh pooh one specific approach, idea or person........ IF it gets the job done and YOUR good with it. That being said.....
The Meat:
I have had more than a few "what if" and "why that" conversations with Glenn at P80. In the beginning they suffered MANY warranty related calls and issues with using drill presses and hand drills both IN DRILLING ALL THE THROUGH FROM ONE SIDE (imagine that!). The Home Depot / Harbor Freight / insert other brand of home user drill press here, almost never comes out of the box "true".
They are sloppy / loose / wiggly and every other description you can concur. They are fine for poking a hole through a piece of plywood or thin steel stock for a screw or bolt hole to "stick something back together" but not for lining up precision holes and accurate spaced boring / reaming.
I have yet to help anyone set up and true a big box drill press that didn't require resetting the chuck (if not replacing) and tram the head and table, then the hole cheap trotline weight "drill press vise" and crappy .50 cent Aliee Express drill bit issue. Add the it's just plastic "ram & jam" out look some folks have and you end up with a call to tech support that goes like this. I drilled the holes in my "machine shop" on my press and nothing lines up...... your jig is defective....... are you going to send me a replacement frame????
It's a warranty CYA for P80! AND if you drill each side separately (kinda sorta square) it may not be "perfectly 90 deg." but it will work and it's repeatable. Tabs are the same, 50 different ways to do them.
The instructions work (if you read them... twice!), so does MGB's (if you follow them) as well as Racers & Duck's and pretty much most all of us here, for the ways that we have ADAPTED. Why??, "Enough common sense to fill a thimble" as Grand Mother used to say. My way..... I have literally done them with a hand reamer and X-acto knife at a off grid cabin that had no power all the way to chucking them up in my mill and push play while I start the Cerakoate prep on the other parts. Yep, lotsa ways to skin them cat's ;-)