Tip! Alternate Tab Removal Method

If we ever get the Constitution back and these are cheap and easy to get again I might try the pocket knife or maybe chisels and a Yankee Push drill or maybe a brace and bit? For a full off the grid special.
 
Heck, you can use a utility knife to cut the tabs, and you'll be fine.
This has actually become my preferred method. Score the side of the tab a bit with the point and then slowly push deeper into the tab. A little clean up from the rail is all that is needed and you get a couple of "chunks" of polymer to sock away in case it is ever useful for a repair.
 
Yep... just take your time. Heck, you can use a utility knife to cut the tabs, and you'll be fine. You don't have to get "fancy." But sometimes "fancy" suits your fancy! But yeah.... just go slowly and don't be in a hurry.

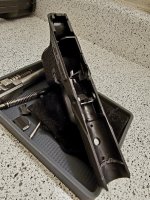
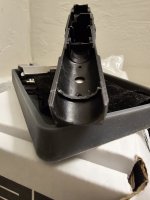
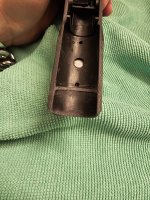
I've built six, so far, and the part that still makes me nervous is drilling the pin holes. :)

Just take the plunge, so to speak!

Thanks for joining the forum and participating by posting! When you get a chance, please write up a quick “introduction” (or RE-introduction if you were a former MGB forum member) of yourself over in the Introduce Yourself! section. Tell us about yourself, your building experience, and how you found the forum.

Jump into other threads, too! Come on in... the water's fine! 😊
Appreciate the positive vibes! Speaking of drilling the holes, did you use the bits provided or smaller ones like MGB did In his video? Not super nervous about drilling the holes as long as I know I have the correct bits.
I'm mechanically inclined but I def lack sanding and polishing skill so I guess this will be a good warm up. 👍 will definitely be going slow
Kit bits worked fine for me.
 
Looks like it works fine.
Gotta be real careful though with your thumb that close to the disc.
At least you don't usually bleed much when an abrasive wheel gets you.
 
I used the smaller bits recommended by MGB. But then you have to hand ream the 3-mm holes just a bit. I like a tight pin.
That's exactly what I plan on doing as well. In the process of ordering a Brad point as we speak. I like it tight as well and it just makes sense.. I'll be cleaning the internals this weekend, cutting the tabs with fret cutters and sanding as well..

was also seriously considering ordering a Johnny Glocks striker assembly too. Never tried one out before but they got great reviews 🇺🇸
 
I suggest @MarineGunBuilder recommended bits…best practice far as I’m concerned.
I believe there’s a link to tools on the video pg by opening more text. If links are not working please message me and I will fix them.

Here’s a link to MGB tools on amazon
 
Last edited:
Got the tabs off and sanded, will probably go over em a little more tomorrow to get them more FTQ. Used fret cutters and zip hand sander...

Got a big chunk of the channel out, used a dremel and some hand files. The dremel did slip a few times and created very minimal marks. Should I be concerned about that??? Any recommendations on what to use to sand the rest of the channel down would be greatly appreciated 🇺🇸
 

Attachments

  • 20231118_173107.jpg
    20231118_173107.jpg
    7.3 MB · Views: 20
  • 20231118_173318.jpg
    20231118_173318.jpg
    845.4 KB · Views: 20
Got the tabs off and sanded, will probably go over em a little more tomorrow to get them more FTQ. Used fret cutters and zip hand sander...

Got a big chunk of the channel out, used a dremel and some hand files. The dremel did slip a few times and created very minimal marks. Should I be concerned about that??? Any recommendations on what to use to sand the rest of the channel down would be greatly appreciated 🇺🇸
If you have the flex shaft attachment for your Dremel, a sanding drum is great for taking it down real close to finished. The flex shaft allows you to bring the tool in horizontally in the channel instead of at an angle as with the Dremel itself.
Then swap out the sanding drum for the Cratex polishing tip together with a little water to get the plastic looking factory smooth. The minimal marks you mention may be polished out with the Cratex tip. If not, it is of no functional consequence, just cosmetic.
 
So made a little more progress on the channel tonight. Mostly used a file, sand paper and hit it with the dremel a little. Trying to go slow and play it safe... BUT I spaced and didn't put tape inside and obtained some ugly surface scratches from the sand paper.. any useful tip on what to use to clean it up would be appreciated. A polisher??
 

Attachments

  • 20231122_225401.jpg
    20231122_225401.jpg
    2.4 MB · Views: 19
These things are like AK's. If it clears it works. The front spring acts between the slide and the front block. There's absolutely no benefit to anything more than making sure nothing is rubbing. Same goes for the lugs. You can whack out an extra 1/4" of plastic with each lug and it will have no effect whatsoever on the function of the gun. If these were still cheap and available I'd probably do one with a chainsaw.
If you feel the need to lavish attention on a build get a muzzleloader kit. You can inlet and polish the walnut stock to translucent perfection. Maybe even inlay and cut your own checkering. Not to mention the metal!!! Fitting, polishing, blue or brown!!! When you're done you will have an Heirloom Grade piece of firearm history for not a lot of money.
Honestly if I spend more than a few hours on anything modern I get bored. Inletting and inlays are intricate. Laying out and cutting a checkering pattern is probably the most nerve wracking thing I've done. One false move and the stock is ruined.
 

Attachments

  • IMAG0075.jpg
    IMAG0075.jpg
    891.9 KB · Views: 19
Last edited:
So made a little more progress on the channel tonight. Mostly used a file, sand paper and hit it with the dremel a little. Trying to go slow and play it safe... BUT I spaced and didn't put tape inside and obtained some ugly surface scratches from the sand paper.. any useful tip on what to use to clean it up would be appreciated. A polisher??
As mentioned in my previous post, taking the partition down as close to the surrounding plastic as you feel comforable. Then swith to the gray cratex polishing point. Use water as a sanding medium. When you're done it should look factory with no evidence the partition was even there.
While the green polishing points are featured in the tool list, the gray ones are a bit coarser and seem to work better for all but the final polish.

Amazon product ASIN B07R3Z5VLG
View: https://www.amazon.com/Swpeet-Silicone-Polishing-Polisher-Mandrel/dp/B07R3Z5VLG/ref=sr_1_58?crid=1T4B0T1B6IFBP&keywords=cratex+polisher&qid=1700746408&sprefix=cratex+polisher%2Caps%2C167&sr=8-58
 
These things are like AK's. If it clears it works. The front spring acts between the slide and the front block. There's absolutely no benefit to anything more than making sure nothing is rubbing. Same goes for the lugs. You can whack out an extra 1/4" of plastic with each lug and it will have no effect whatsoever on the function of the gun. If these were still cheap and available I'd probably do one with a chainsaw.
If you feel the need to lavish attention on a build get a muzzleloader kit. You can inlet and polish the walnut stock to translucent perfection. Maybe even inlay and cut your own checkering. Not to mention the metal!!! Fitting, polishing, blue or brown!!! When you're done you will have an Heirloom Grade piece of firearm history for not a lot of money.
Honestly if I spend more than a few hours on anything modern I get bored. Inletting and inlays are intricate. Laying out and cutting a checkering pattern is probably the most nerve wracking thing I've done. One false move and the stock is ruined.
Thanks for the insight, good to know and appreciate it. Definitely eases the mind
 
As mentioned in my previous post, taking the partition down as close to the surrounding plastic as you feel comforable. Then swith to the gray cratex polishing point. Use water as a sanding medium. When you're done it should look factory with no evidence the partition was even there.
While the green polishing points are featured in the tool list, the gray ones are a bit coarser and seem to work better for all but the final polish.

Amazon product ASIN B07R3Z5VLG
View: https://www.amazon.com/Swpeet-Silicone-Polishing-Polisher-Mandrel/dp/B07R3Z5VLG/ref=sr_1_58?crid=1T4B0T1B6IFBP&keywords=cratex+polisher&qid=1700746408&sprefix=cratex+polisher%2Caps%2C167&sr=8-58
Will do thanks. Been using mineral oil as I'm sanding down.. being a little ocd, those scratches bug me and tend to get easier to happen as that channel is close to being flush
 
Will do thanks. Been using mineral oil as I'm sanding down.. being a little ocd, those scratches bug me and tend to get easier to happen as that channel is close to being flush
Polishing tip and water will make them disappear.
 
Back
Top